Introducing… Stash Pass CLI!
Old-timey radio announcer: We interrupt this regularly scheduled program of design patterns to bring you an important announcement!
I published a CLI application on PyPi called stash-pass-cli! stash-pass is a command-line tool for securely managing your passwords locally. All data is encrypted using a master password and never leaves your machine.
This is my first time publishing a project on PyPi, so any feedback is welcome. You can find the code here. Before we dive into the details of the CLI, some context is in order.
Context
Many, many moons ago, I started using Norton Password Manager for all of my passwords. And, like your terrible RuneScape username of old, it just stuck with me. I didn't have the motivation or the care to make a change. It does the trick, for the most part, so there was no reason to migrate off of it.
I was recently in a conversation with a friend about password management. When I mentioned I was still using Norton for managing all of my passwords, he apologized.
sigh... I guess I'm not "in with the times."
It made me think, "Do I even like using Norton, or am I just using it because I've captured so many of my passwords there over the years?"
I reviewed the mess that I had made over the several years of throwing passwords into Norton, and there was no quick or easy way to organize, update, or delete the few hundred passwords I had stored.
Like all engineers, I thought, "I could just build it."
Stash Pass CLI
I decided to create a command-line interface to start. There were a couple of key things I wanted to learn.
- Typer
- Cryptography
- Publishing to PyPi
Typer
Typer is a robust Python library for building command-line interfaces. If you are familiar with libraries like Flask, picking up Typer should be a breeze. Here's an example:
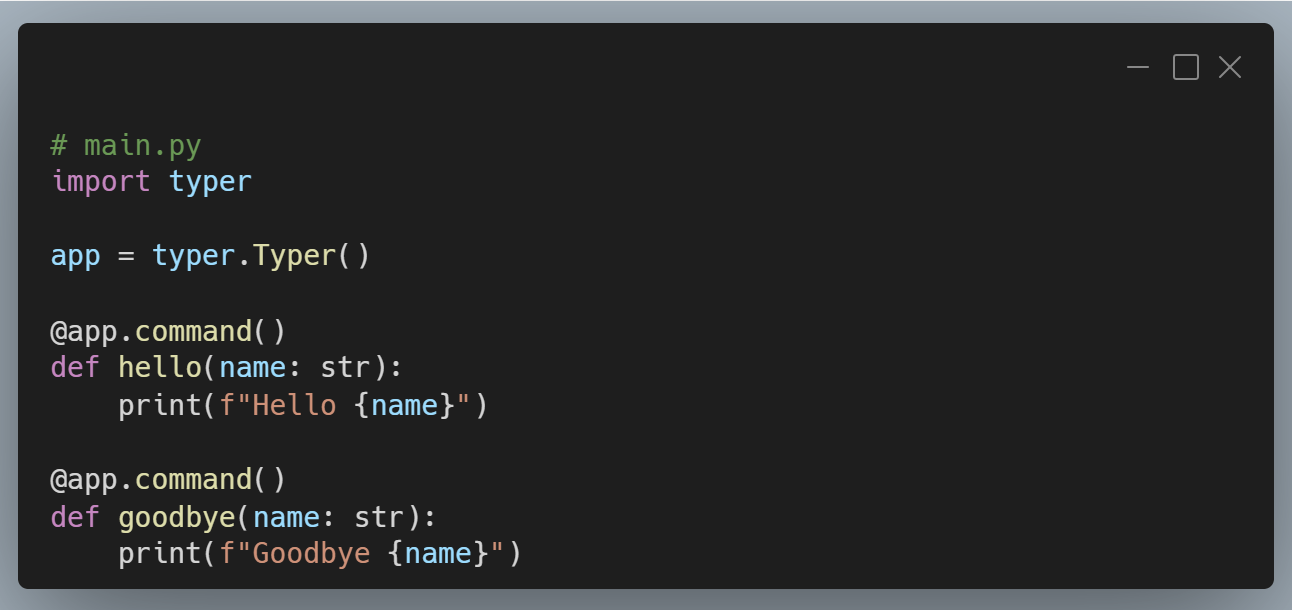
Running python main.py --help will show you an intuitive help screen with the available commands at your disposal: hello and goodbye.
That's it, with this little bit of code, you can create a CLI app!
Of course, there's a lot more functionality that's built into Typer, and I use some of it in Stash Pass.
Cryptography
As a data engineer, I've used hashing for data comparison and testing, but I haven't needed to venture into the cryptography library much for anything else. Needing to make sure that passwords stored locally were also secure was the perfect opportunity to learn more. Here's how I implemented.
- Storing Secrets: You have a vault where sensitive information (like passwords) is stored. This vault is saved as a file on your computer, not on some other server.
- Master Password: To access the vault, a user must enter a master password. This password is crucial because it controls access to all the stored secrets.
- Salt for Extra Security: A unique "salt" (a random string of data) is generated and saved. This salt is used to make the master password stronger and harder to guess. Even if two users have the same password, the salt ensures that their encrypted keys are different.
- Key Derivation: The master password and the salt are combined using a process called PBKDF2HMAC. This process takes the password and salt and turns them into a secure key that can be used for encryption. It involves many iterations (390,000 in the case of stash pass) to make it very difficult for attackers to crack, should they get access to your local files.
- Encryption with Fernet: The derived key is then used to create a Fernet object, which is a tool for encrypting and decrypting data. When you save a password, it gets encrypted (turned into a secure format) using this key. When you want to retrieve it, the Fernet object uses the same key to decrypt it back to its original form.
Overall, this approach ensures that even if someone finds the vault file, they cannot read the passwords without knowing the master password and having access to the salt. This adds multiple layers of security to protect sensitive information.
Publishing to PyPi
While I've created many internal tools and applications using Python, I've never published to PyPi, so this project allowed me to learn that process as well. Thankfully, it's very straightforward!
I use uv to manage the project, and between the documentation on publishing with uv and publishing typer apps, creating the GitHub action to publish was a piece of cake.
This allows you, dear reader, to simply run pipx install stash-pass-cli (or pip install --user stash-pass-cli if you're not using pipx) and the functionality of the CLI is available to you. What are those lovely features?
Features
With stash pass you can manage all of your passwords from the CLI. After installing, you need to set your master password. You can do that by running...
stash-pass settings set-master-passwordThe CLI is split into two sub-apps: vault and settings. vault is where the magic happens. settings functionality is really only for the master password at this time, but I'm expecting it to be used for other things in the future.
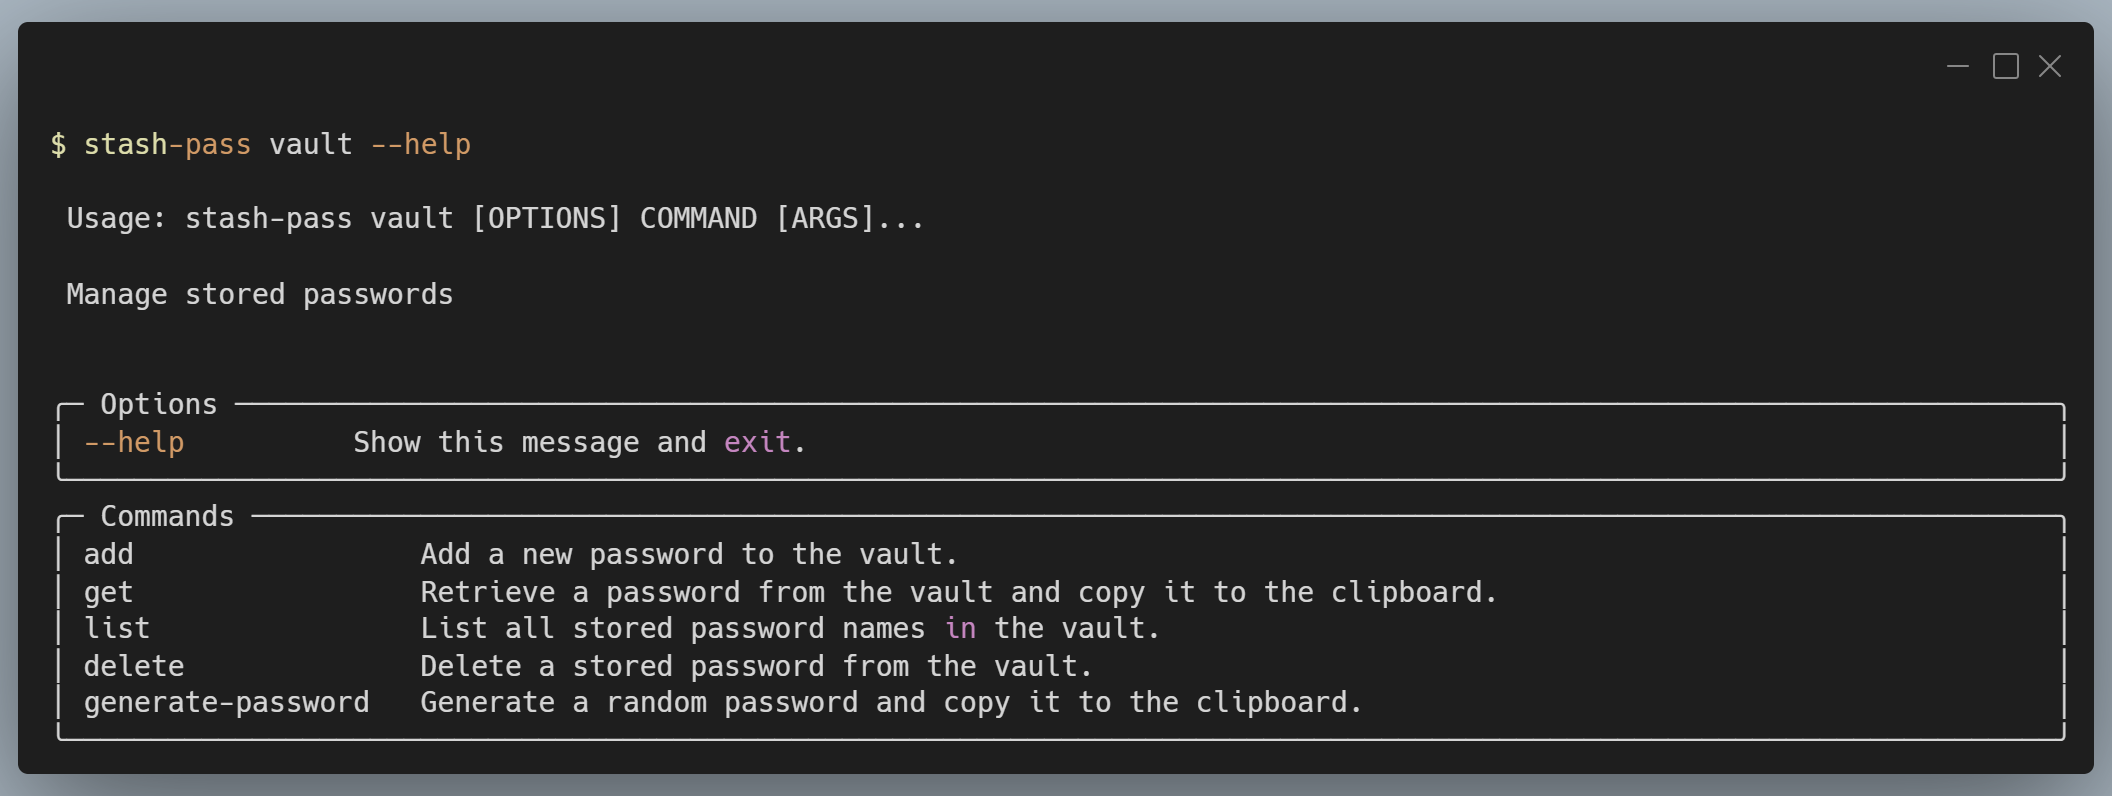
With the vault sub-app, you can...
- Add passwords
- Get passwords
- List passwords
- Delete passwords, and
- Generate passwords
To see all of these commands, you can run stash-pass vault --help.
Again, feedback is welcome. If you see anything wrong or that can be improved, add an issue to the repo.
Thanks for your time and attention, and happy coding! 😁